DIY/How-To: Wrinkle texture paint
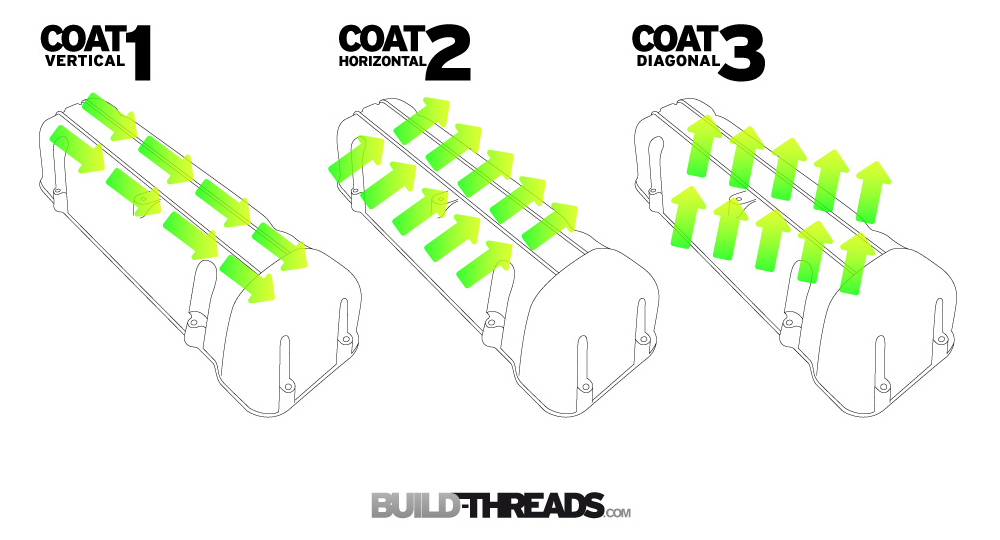
Wrinkle finish, texture finish, wrinkle coat, hammer finish, crinkle finish, whatever you want to call it, it’s a fickle creature. Desired by many, but frustrating to get it right. Personally I’ve had very poor results with this stuff over the years, often finding myself disappointed when my newly painted part doesn’t even come close to emulating the OEM finish I desire. Well, Last weekend I finally got it right after channeling a few tips I’ve read online over the years (and in a previous issue of AutoSalon Magazine). The general consensus was pretty consistent; three heavy coats, each at a different angle from the last, with a bit of heat to aid the process. Funnily enough, that same advise was clearly printed on the back of the can, under “Instructions”, who would’ve thought? (Didn’t I feel stupid!)
Step-by-step process below, click on the images for larger 1000px versions…
Here’s what I started with: An old L-series rocker cover which had seen better days, some wax & grease remover, oven cleaner, and of course a can of wrinkle-finish paint.

First up this rocker cover needed a good cleaning. I had some oven cleaner lying around that I bought to clean a gearbox but never used it, so I thought I’d test it out on this.

Apparently it’s quite harmful stuff, and proper protection is recommended, so I sure as hell wasn’t going to take any chances. I’m surprised my neighbours didn’t call the feds when they saw me walking around my front yard like I was building a friken bomb and/or meth lab.

Oven cleaner doin’ work on this inside…

After rinsing off the cleaner I hit it with a high-pressure hose, dryed it off, then wiped it down with some wax & grease remover. When it comes to painting, the cleaner the better.

Scraping off the remainder of the old gasket.

Taped up and ready for a good ol’ paintin’.

As I said earlier, each coat is meant to be at a different angle to the last, the above shows the basic approach I took.

Make sure you lay it on thick as possible. Try to get each coat to the point where the paint almost about to run.

Allow 5mins between each coat.

It goes on smooth and glossy, but the magic happens during the drying stages.

The secret weapon. Since I chose the worst possible weather to do painting (cold and raining), I used a heat gun every now and then to evenly heat up the paint. Be careful not to get too close or leave it on one area for too long, otherwise you might get certain areas wrinkling up more than others, this has happened to me in the past and resulted in me blasting the item with heat out of pure frustration (this approach does not work!).

After the third coat has had some time to dry, you can see the texture starting to form. It’s a slow process so don’t be alarmed if nothing happens straight away.

Crazy huh! All these years I thought this paint produced more of a spotted/grainy texture, but it actually makes these cool squiggly lines, reminding me of a Keith Haring style painting.

I left it to dry properly until the following day. The final step was to sand back the lettering. First I scraped off as much as I could with a razor blade, to make less work for the sandpaper.

As usual, a piece of sandpaper wrapped around a wooden block does the trick.

Keep going until all the paint is off the lettering. At this point you can continue with finer grades of sandpaper and then polish it, but I liked the rougher look of the sanding marks. Some rocker covers have the lettering embossed/sunken into the metal, in that case you can use blu-tac to fill up those areas before painting and then remove it afterwards.

After blowing out all the sanding dust we’re ready to admire the finished product.
I’m very happy with the results, it’s nice and even all over with no blotches or smooth sections. I could have gone further with the sanding, such as the ridge below the lettering, but this was just a test to see if I could do it, and now that I know I can I’m confident enough to paint my FJ rocker cover.
I hope this little write-up helps in some way shape or form if you’re interested in this kind of finish. Please feel free to link to this article if anyone you know is having difficulty getting a good result.
Original: Build Threads


